The APRS Hardwired Cell
Time to get started. Here is the cheapest APRS setup I’ve built so far that communicates on the radio and features two way communications capabilities. I will refer to it as the Hardwired Cell. I implemented this project using mostly stuff that I already owned and only came out of pocket about $18.
What You’ll Need
1. A cell phone (with or without cell service) or a tablet to be the display, input device, GPS, and virtual TNC platform for this project. I own only Android devices, so that’s where I’ll be coming from. However, it’s my understanding that there are options on the Apple side like PocketPackets. You’ll need two audio cables. If you don’t have a suitable device, older used smartphones can be had pretty cheaply. Sprint offered to buy back my old HTC Evo a year ago for $25. Even with a little markup on their part, that tells me that you can get a device pretty cheaply for this project. Note: For reasons I can’t explain, my Samsung Galaxy SIII does not “hear” packets when using this cable. My old HTC Evo? No problem. The best I can determine, the Samsung isn’t detecting that the headphone jack is in use when my homebrew cable is inserted. Not sure why. The Samsung gets packets without issue when I’m using Bluetooth, just not my cable. So my warning is, try your cable on a like device before you purchase said device for this project.
2. A radio with VOX input. I used my HT, a Wouxun KG-UV6D. Be careful if you use a mobile radio. Many of the mobiles that I’ve seen don’t have VOX capabilities. If you go that route, you’ll have to come up with a clever way to trip the PTT in the presence of an audio input.
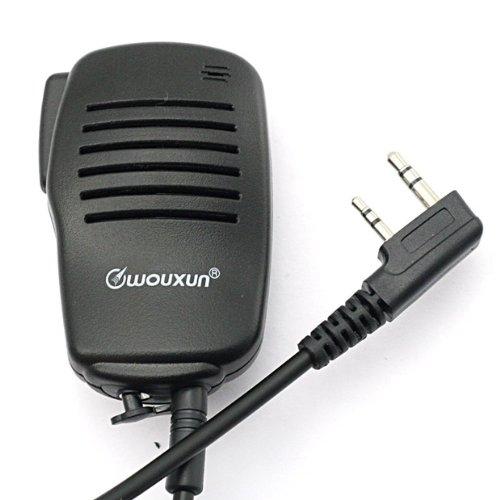
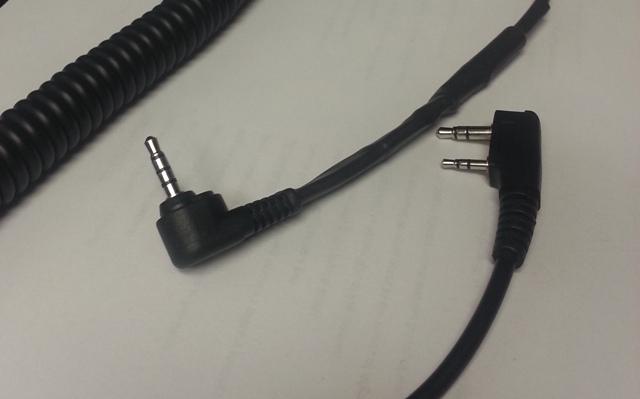
3. An audio cable that will tie into your chosen radio. For those familiar with the Wouxun and Baofeng style adapter, you know there they use a 3.5 mm and a 2.5 mm connector side by side. On my first try I harvested separate 3.5 and 2.5 mm connectors from a few headsets and adapters that I already owned. The problem was, most headphones “paint” on the insulators to the individual wires to keep cords as thin as possible. Melt, burn, scrape… try as I might, I was never happy with my ability to remove this coating and build a low resistance splice. Ultimately, I sacrificed an old hand mic like the one seen below. In addition to having the 3.5 mm and 2.5 mm connections set side by side, I knew the wire would be easy to work with. As an added bonus, the cable retains its professionally made appearance. For $10, I thought it was worth it.
4. An audio connector for your phone. On most cell phones and tablets, the connection is known as a TRRS connector. Take a look at the end of a fully featured headset… one that has headphones, a mic, and a remote built in line. You’ll see that unlike a simple set of headphones, the connector has four separate pathways. Tip, Ring, Ring, Sleeve. When you’re looking for a cable to harvest, you need all four. I had a cable like this one already. http://www.amazon.com/Cable-Showcase-10A1-04106-6-Feet-Camcorder/dp/B000I1D0BW/ref=pd_sim_p_5?ie=UTF8&refRID=1D2XDGWBDHWRVQJQSXSQ
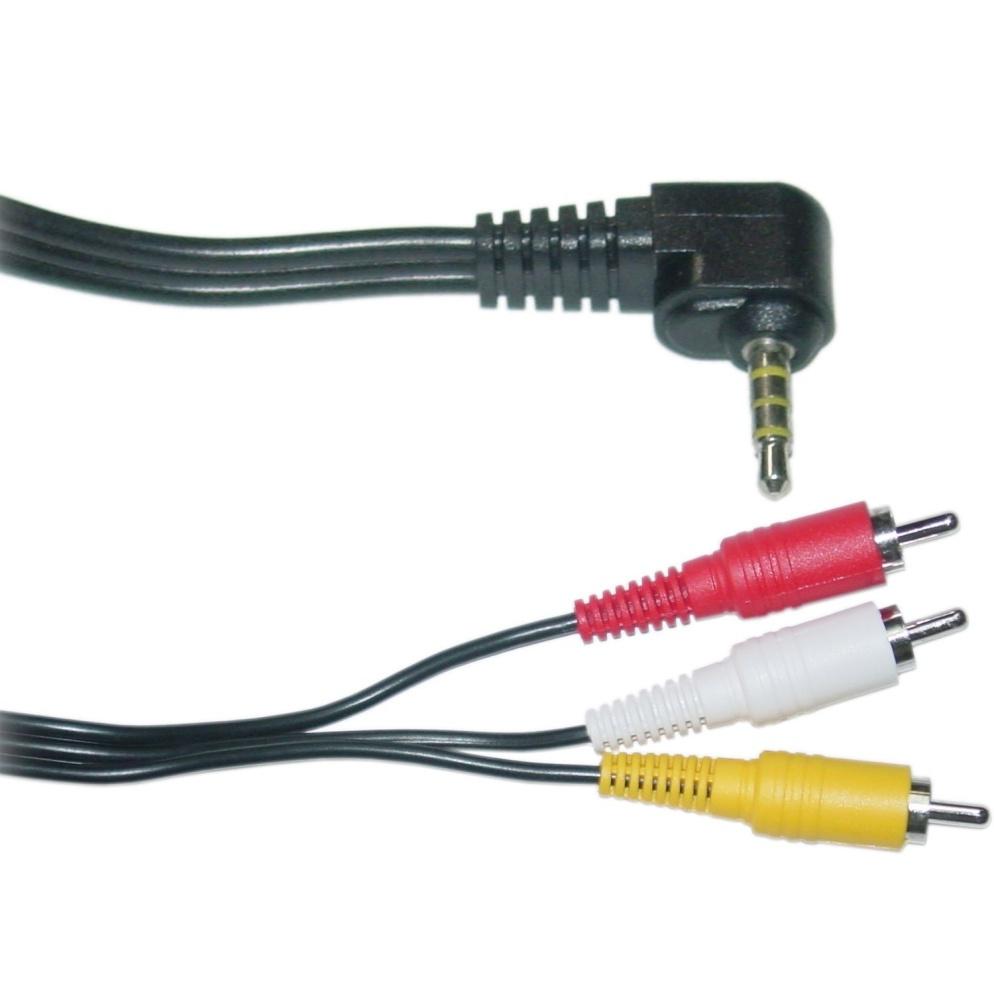
The same proviso applies from before. Painted on insulation can be a bear, particularly when you’re dealing with thin wires. A/V wire such as the one in this link tend to have what I’d call “real” sheathing that is much easier to strip.
Of course, you can buy just the end, but at a lot of the places that I looked it was easier and cheaper to get a full cable and just cut off the end that you need. That is, unless you’re buying the raw connectors in bulk. Plus, the premade ends look better.
5.A simple continuity tester or multimeter to identify wires and confirm your splices.
6. A soldering iron is recommended to improve the conductivity of your splices. This is not required, though.
7. Heat shrink tubing. This stuff is nice to cover up your splices.
Instructions
Step One: Make Your Audio Cable
If you have a Wouxun or BaoFeng, here is a wiring diagram from APRSDroid’s Twitter feed:
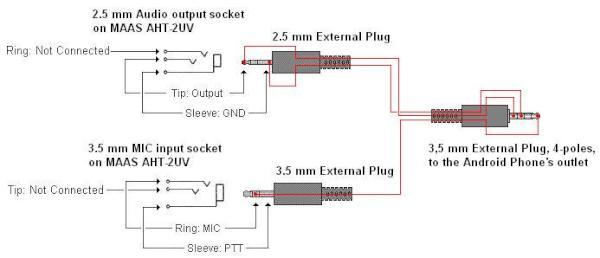
If this sort of stuff isn’t in your normal wheel house, don’t let this diagram overwhelm you. Take it step by step. On the left side of the diagram you have the connection to the HT. On the right, the connection that goes into the headphone jack on your phone or tablet. Strip your wires and use your continuity tester to determine which wires inside the cables line up with the tips, rings, and sleeves on your wire. Label and splice accordingly. Once spliced, make sure you check continuity from one end to the other to make sure no mistakes were made. Once you’re sure your connections are good, solder and heat shrink or wrap the splices in electrical tape. If you’ve never used heat shrink tubing, it’s simple. Be sure to choose a size just slightly bigger than the splice you want to cover and slide the tubing onto the wire before you begin splicing. Otherwise, you won’t be able to get it on the wire due to the size of the connectors on either end. Once it’s where you want it, apply heat. Most manufacturers recommend a heat gun or heat shrink oven in order to apply even heat and limit the chance of scorching or lighting the tubing or surrounding insulation on fire. I’ve also heard some people say that they use a soldering iron held close to the tubing without actually touching it.
Note: Some hams who have built a cable such as this one have taken the additional step of adding resistors to the line to keep the cell phone or tablet from over driving the audio to the radio and distorting the packet. In my testing, this isn’t absolutely necessary if you adjust your audio settings appropriately. Having said that, make sure you check the packets you’re sending out by listening to them with a second radio. We don’t want to create QRM on 144.39. Plus, the cleaner your packet audio is, the more likely it will be that it gets decoded successfully.
Here’s my finished product. The heat shrink tubing is covering the splice towards the top right corner of the picture.
Step Two: Install and Configure APRSDroid
Go to the Google Play Store and buy APRSDroid. At the time of this writing, it’s only a few bucks and well worth everything that its creator is asking. Once you have it installed, we’ll do some configuration.
1. Go to preferences.
2. Enter in your callsign. In APRS you’ll often see stations with an additional identifier after their call. This is to delineate between different stations that they may own. When APRSDroid says “without SSID,” they mean without the additional identifier. Just enter in your FCC callsign.
3. Assuming that you don’t already have an APRS-IS passcode, request one through the link in the preference menu now. APRS has an internet backbone. It’s what lets you see radio traffic through websites like APRS.fi. It’s also what lets APRS text messages reach beyond the local area. Note: APRS-IS will require proof of your license, as they should. You will be passing traffic across their network that will eventually cross the RF line. They have a duty to verify that you are licensed. If you’ve registered for a service like Echolink, then you know what I’m talking about.
4. Once you get your APRS-IS passcode, write it down somewhere safe (you will forget it) and type it into APRSDroid.
5. SSID. Choose what type of station you are. In my case, I use -9 because I run this setup in my car. As you can see from the drop down menu, there are several options available.
6. APRS Symbol. This is one place I think the program should include additional information. In short, there are a bunch of different symbols that can represent stations on an APRS map. The only way to know what is available is to look at a chart such as the one here. http://www.aprs.org/symbols.html
The Cliff’s Notes version is this: /- if you’re a house, /> if you’re a car, /k if you’re a truck, /v if you’re a van. There are many more options, but this will get you started. I recommend ditching the default /$ (a phone handset) unless you’re using APRSDroid exclusively through the cell network.
7. Comment field. This is how you let people know how to reach you. If you had a slick Kenwood or other APRS integrated radio, this field would auto populate with the frequency that you are monitoring. While it can be a hassle to keep up with, I recommend that you try to do the same as it will be particularly helpful for people passing through the area. Maybe one of repeater frequencies and tones? I’ve also seen people put email addresses here, but beware of spambots that crawl the internet (your radio packets will end up on the internet if an IGate hears them). Remember, the goal is communications, not vehicle tracking. If you don’t tell people how to communicate with you, then you just have a ham based LoJack.
8. Unless you’re a base station, I’d turn SmartBeaconing on. Some software decides to update your position after a set amount of time regardless of whether you’re moving or not. SmartBeaconing knows to transmit more frequently when you’re moving quickly or when you’re changing direction.
9. Location Settings. This is where you fine tune SmartBeaconing. For a fixed station, any reporting more often than once every 30 minutes is a bit overkill unless you’re a weather station. 15 is the recommendation there. Remember, unlike your computer, if there is a packet collision, the packet isn’t resent in this system. Overloading the frequency means preventing messages from getting through. Northwest APRS, one of the best organized regional APRS booster organizations in the US, recommends no more frequent updates than the following for mobile stations:
If using no relay or WIDE1-1, 1 min.
If using WIDE1-1,WIDE2-1, 2 mins.
If using WIDE1-1,WIDE2-2, 3-5 mins.
WIDE2-2 is the recommended path setting for fixed stations, WIDE1-1,WIDE2-1 for mobile, and WIDE1-1,WIDE2-2 is ok if you’re in a very rural or mountainous area. More on paths in a little bit.
APRS.net recommends the following speed settings for normal driving:
Fast Speed – 60 mph or 97 kph
Fast Rate – 180 sec
Slow Speed – 5 mph or 8 kph
Slow Rate – 1800 sec
Min Turn Time – 15 sec
Min Turn Angle – 30 deg
Turn Slope – 255
10. Position Privacy. If you want someone to know that you’re in radio range, but you don’t want them to know what specific house or store you’re parked at, change your position ambiguity. I personally use setting 2 and for my purposes, I turn off speed, bearing, and altitude. If I was tracking a balloon launch, I’d want all of that. For a mobile station, I just want people to know I’m in radio range. You could make the case for enabling the speed setting, though, so people can deduce that you may not actually be in your car at the moment (it’s parked?).
11. Connection Protocol. For the hardwired cell, you want Audio Frequency Shift Keying (AFSK) via Speaker/Mic. In a later project, we will use Bluetooth TNC. As a side note, if you find yourself somewhere with a tablet or a cell with an internet connection but no radio, you can change this field to allow communications through the internet. Keep in mind, though, that radio stations in the area won’t see you even though you can see them (or at least, those who are being picked up by IGates).
12. Connection Preferences. I don’t know if my phone is capable of High Quality Demodulation. I’ve tried it on and I’ve tried it off. I’m not sure that I’ve noticed a difference.
The main thing you want here is the path. See step 9 for the discussion on that. NWAPRS.info is a good source for descriptions on how the path process works.
You many need to adjust the frame sync to trigger VOX so that your packet doesn’t get clipped as the radio is just firing up. Mine is set to 1000ms.
Audio Output won’t work on some phones. Basically, it’s possible to voice call someone briefly on the APRS frequency (144.39 in North America) to ask them to meet you on another frequency. If someone does that when you’re on, Audio Output is asking you how you’d like to be notified. I say this won’t work on every phone because many phones would then route that audio notification to your headphone jack and back into your mic port on your radio where VOX would be triggered. Not good. While we’re on the subject, go ahead and turn off all system notification sounds on your phone or tablet.
13. Keep Screen Awake. I ride with my cell phone mounted on my dash like a GPS allowing me to see who is nearby. If that’s you, you’ll want to enable “keep screen awake.”
Ok, you’re ready for…
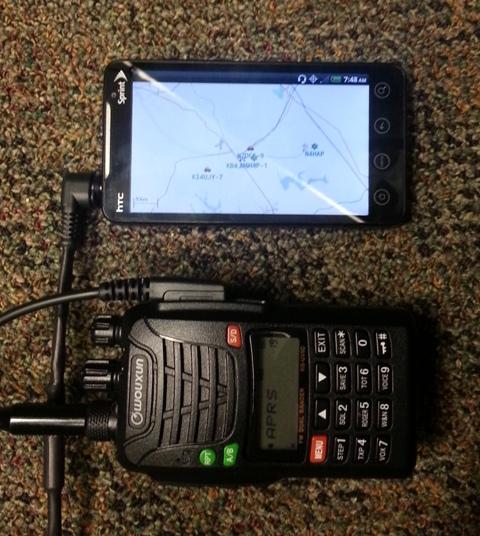
Step Three: Connect Your Radio and Phone
That was easy.
Step Four: Configure Your Radio
1. If you’re in North America, the APRS frequency is 144.39. For other countries, see APRS.org. Note: It is possible that this frequency can deviate in your area to handle special event traffic or to balance heavy network loads.
2. Enable VOX and ensure that it is sensitive enough that APRSDroid’s packets trip it. My VOX is set to one. Note: Make absolutely certain that your VOX isn’t set so sensitive that a simple electrical hum that might be generated by your phone’s audio when plugged into vehicle power doesn’t trigger and hold the VOX. Also, be sure to turn VOX off before you breakdown this setup. You will be embarrassed when you unintentionally broadcast your conversations with your family because you left VOX on and forgot about it.
3. Adjust squelch so that weaker packets aren’t blocked.
Step Five: Start Tracking
From the Hub or the Log, hit start tracking. If everything is correct, you should start seeing packets soon. In the Log, you will see all the data received in a packet. In the Hub, you only see the most recent report from a station in order of station distance. Switching over to the Map will display those objects against a map. If your cell phone or tablet is online, the objects will be superimposed on a Google Map. If you’re offline, the APRSDroid website has instructions for downloading and installing OpenStreetMaps for offline use. I’ve used both and while I prefer Google Maps, OpenStreetMaps works fine for internet free operation.
Congratulations! If everything is working, you’re part of the APRS network. If not…
Basic Troubleshooting Steps
– If you’re not decoding packets, use your phone’s audio recorder to confirm that the phone is hearing packets at all and make sure that they are not distorted. Is the captured audio clear? Is it too loud and over driven? Is it too soft? To get test audio you could sit on 144.39 and wait for packets to come in, or you could tune to another frequency and send voice traffic from another radio. From here, you can adjust audio levels accordingly.
– Is your radio opening squelch fast enough to capture the whole packet? Keep in mind that APRS has no error correction. If the receiver doesn’t catch all of the packet 100% accurately, the packet is no longer decodable. The test above may help you determine if this is the issue. However, unless the clipping is really egregious, it will be hard to tell since packets are generally really short to begin with. That’s why switching to another frequency and sending multiple test voice messages may be easier.
– To confirm that your packets are getting out, use a second radio to confirm the transmissions. Keep in mind that websites like APRS.fi will only display things that the IGates heard. You may not be in range of an IGate or a Digipeater that is.
– If you find that objects are disappearing from your Hub or Map, check your Show Last settings. It’s possible to limit packets to only those received in the last 30 minutes. If you want to see objects beyond that time, adjust accordingly.
– When I got started in APRS, I thought my Hardwired Cell was broken during many commutes. Through testing, I’ve found that there are just some places in the Nashville area with lousy APRS coverage. 840 between Nolensville Pike and I-24 or I-24 from 840 down to Beech Grove are two examples. This will change as Digipeaters go up or down, but keep in mind the dead spot issue when you use APRS.
– HTs are the easiest way to build this setup. However, remember that HTs, especially in a car, have serious limitations. If you want to improve this setup, the cheapest and easiest first step is mounting an antenna outside the vehicle. The factory rubber ducks barely cut it for voice. When a voice gets choppy, you can sometimes still make out what is being said. Packet radio is not that forgiving. If any part of the packet is unreadable, the whole packet is lost. I’ve run my Wouxon in my car off of the standard rubber duck and a proper 5/8 wavelength mobile antenna. Counting packets across the same commute, I pull 49% less packets with the rubber duck inside the vehicle. When inside the house and out of the metal cage that is my vehicle, I do a bit better. Typically the rubber duck in that scenario only looses 25% of the packets. Bear this in mind when you think your cable or APRSDroid is failing you.
Credits and Links
Thanks to KC7IPY at 4x4ham.com for the idea for this project. http://www.4x4ham.com/showthread.php?2078-APRS-with-just-an-Android-phone-and-an-HT-that-supports-VOX
Thanks to Georg Lukas of APRSDroid.org for creating that fine Android program and saving me $80-200 on a TNC. I’m looking forward to quick comment changing presets in a future release.
Thanks to Bob Bruninga, WB4APR, for starting APRS 21 years ago and continuing to advocate for it. For more info on APRS, go to www.aprs.org. APRS is a registered trademark of Bob Bruninga.
APRS.fi is my current favorite APRS tracking website. In the context of this article, it’s a good tool for checking to see if your packets are getting out to the world if you don’t have a second radio and you live close enough to an IGate or a Digipeater that can get you to one.
– Dallas, K7DCC
This page was created on 2/28/14 and last updated 3/12/2014.
UPDATE (2/8/16):
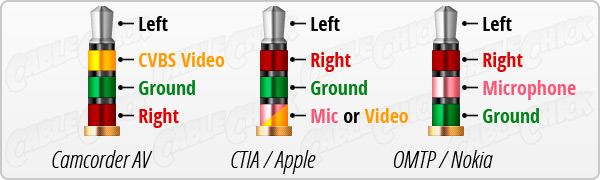
I received the following message in February of 2016 that is very helpful to those working on this project. Apparently, not every phone manufacturer is using the same wiring diagram for TRRS connectors.
From Dymitr G.:
“With regards to the problem of the the cable working with the HTC Evo and not working with the Samsung Galaxy SIII, it may be because they probably have different plug connector interfaces. According to my finds ( I may be wrong), the HTC uses CTIA/AHJ plug and the Samsungs models launched up to 2012 (I guess your Galaxy SIII was launched in that year) uses the OMPT Connector Interface.
They look pretty much about the same with the difference that the sleeve and first ring (from bottom to top) have inverted connections. Please have a look at the illustrations below: